Development of Innovative Characterisation Methods

In addition to the usage of an abundant range of standard methods for analysis of materials, MCL permanently improves existing and develops new characterisation techniques within the framework of the ongoing research activities. In this way, the characterisation portfolio is steadily extended.
Contacts
Currently, MCL is developing the following methods:
Residual Stress Analysis Based on Bending Beam and Slit Methods
Mechanical properties such as strength, ductility and fracture toughness are strongly dependent on the residual stresses present in a material. X-ray diffraction techniques enable both the determination of macroscopic residual stresses (1st order stresses) as well as the integral measurement of microscopic residual stresses (2nd and 3rd order stresses).
For local analysis of microscopic residual stresses (e.g. inside a particular grain or within nm-sized thin films) the bending beam (interlayer removal (ILR)) method and the slit method are applied.
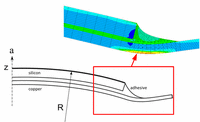
The bending beam method is used for calculation of the residual stresses in individual layers of multilayer systems by means of the beam deflection. Using the slit method requires a FIB-cut into the surface inducing a stress relaxation. The subsequent application of image correlation enables the estimation of the magnitude of compressive and tensile stresses in the surrounding area.
Curvature Analysis by Rocking-Curve Technique
By means of X-ray diffraction, qualitative and quantitative phase analysis (e.g. retained austenite quantification) as well as determination of textures (preferred orientation) and residual stresses are routinely performed at MCL.
The recently developed Rocking-Curve method allows for the determination of the curvature of monocrystalline surfaces and additionally enables the calculation of the residual stresses if the mechanical properties are known. Amongst others, the method is relevant for microelectronic components (e.g. silicon wafers) embedded in translucent organic resins which are subjected to cyclic thermal loading.
For an appropriate measurement, the angle between incident X-ray beam and detector is set to a specific diffraction peak of the investigated single crystal. The diffraction intensity is recorded as a function of the sample orientation, with the rotation axis perpendicular to incident and diffracted beam. If the surface is curved, all surface zones with a specific orientation contribute to diffraction. Repeated measurements enable the reconstruction of the shape of the surface.
From Damage Mechanisms to Tool Health Monitoring
To assure a constant and high quality level of e.g. milled products, it is beneficial to have information about the condition of the tool’s cutting edge at every point in time during the production process. Therefore, the tool load components most relevant to tool degradation are continuously monitored throughout the process.
The goal of this so-called "Tool Health Monitoring" is to develop a smart machine tool that provides its operator with real-time information on significant changes in the process and the damage state of the used tools. In this way, the maximum tolerable tool loads and the optimal tool exchange intervals can be identified in a knowledge-based manner.
A prerequisite to the interpretation of production process data patterns requires a link to their physical cause. This in turn requires a close cooperation between tooling experts and data analysts. To this end, MCL’s expertise in the field of tool damage mechanisms and simulation is combined with the know-how of the Institute of Automation of the Montanuniversität Leoben with regard to analysis of large amounts of data as they are collected in very long instrumented experiments.
Mechanical Properties of Extremely High Strength and Brittle Materials
Since its very beginnings, MCL deals intensively with the characterisation of extremely high strength and brittle materials like high strength steels, hard metals or highly wear resistant materials. The main focus of methodical developments has always been put on the development of characterisation methods for determination of the mechanical properties, e.g. yield strength, flow behaviour, ductility, fracture toughness but also cyclic properties like LCF- and HCF-behaviour as well as da/dN-curves, of materials with highest strength. In turn, these measurement data form the fundamental basis for the description of the material and damage behaviour during service.
Nowadays, MCL is capable of testing all these properties not only at room temperature but in a temperature range from -100°C to more than 1200°C.
Examples for that development are:
- Cyclic strain-controlled testing of hard metals up to 900°C
- LCF-behaviour incl. threshold value determination of extremely high strength tool steels
- da/dN-behaviour incl. threshold value determination of high strength steels
- Study of the growth of small cracks in high strength steels by means of artificial small defects, introduced by FIB milling


![[Translate to Englisch:] Hochauflösendes REM-FIB am MCL](/fileadmin/_processed_/0/b/csm_04_Allgem_REM_BSa_9e524124fe.jpg)
![[Translate to Englisch:] Mittels REM-FIB freigeschnittener Biegebalken mit Verformung durch Eigenspannungen](/fileadmin/_processed_/f/9/csm_04_Biegebalken_BSa_6073af3e58.png)
![[Translate to Englisch:] XRD Goniometer (Bruker D8 Discover) für Rocking-Curve Verfahren](/fileadmin/_processed_/0/c/csm_Kruemmungsanalyse_Bild_XRD2_3dc5ba03b4.jpg)

![[Translate to Englisch:] Temperaturverteilung in einem Fräswerkzeug und dem gebildeten Span](/fileadmin/_processed_/e/e/csm_04_Tool_Health_TKl_32b5f3de1c.png)
![[Translate to Englisch:] LCF-Verhalten von Schnellarbeitsstählen](/fileadmin/_processed_/e/0/csm_LCF_HSS_70e9f3fada.jpg)
![[Translate to Englisch:] Induktiv erwärmte LCF-Probe im Vakuum (bis 1500°C!)](/fileadmin/_processed_/f/d/csm_LCF_bei_HT_6bf7852126.jpg)
![[Translate to Englisch:] Stauch- und Zugfließkurven unterschiedlicher WC-Co-Hartmetalle](/fileadmin/_processed_/6/f/csm_Stauch-Zug-Hartmetall_ce706290c8.jpg)